Complete Guide to Raiding in Rust: Tools, Strategies, and Base Designs
Discover raiding guns: Yoka Pistol, Semi-Automatic Rifle; explosives: Beancan Grenade, Eoka Grenade, Flamethrower; Grenade Launcher ammo; and raiding strategies.


Tools for raiding in rust
In this article, we will cover the tools commonly used for raiding in the game. These tools play a crucial role in breaching bases and uncovering valuable loot rooms.
1) Guns for Raiding
Two guns are frequently utilized for raiding: the Yoka Pistol and the Semi-Automatic Rifle.
The Yoka Pistol, when used with handmade shells, serves as a cheap and effective early-game raiding tool. It is mainly employed for taking down wooden doors, making it an essential weapon for base entry during the initial stages of the game.
The Semi-Automatic Rifle, typically equipped with a silencer and explosive rounds, allows for quiet takedowns of sheet metal doors. With a group of friends, a door can be brought down in under 10 seconds, making it ideal for swift base access before encountering resistance.
2) Explosives for Raiding
Among the explosives used for raiding, the first one we will discuss is the Beancan Grenade. Although it is rarely used for directly raiding bases other than wooden doors, it serves a purpose in crafting satchel charges. It requires four Beancan Grenades to make a satchel charge.
The Eoka Grenade is the cheapest explosive that can be crafted and is effective for early-game raiding. However, it has a 15 per cent dud chance, meaning it may not detonate on the first try, requiring the raider to pick it up and try again.
The Flamethrower is another inexpensive tool utilized for raiding wooden bases, destroying traps, and even taking down players. It requires low-grade fuel as ammunition and can quickly dismantle wooden doors and structures. Effective use involves short bursts to conserve fuel, as it creates small fireballs that continue to burn the targeted item.
3) Grenade Launcher for Raiding
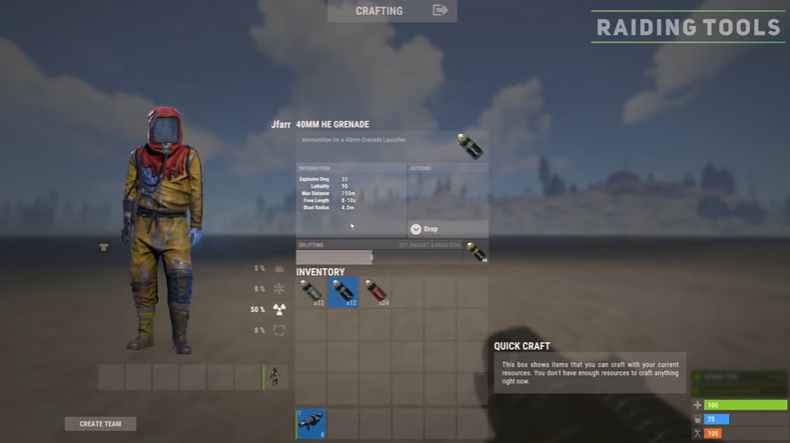
The Grenade Launcher is a multi-tool weapon that finds application in raiding, combat, and creating cover. It cannot be crafted and is exclusively found by heavy scientists. The Grenade Launcher can use three types of ammunition: the 40-millimeter Smoke Grenade and two other types yet to be described.
The Grenade Launcher can utilize the 40-millimeter HE Grenade and the 40-millimeter Shotgun Round.
The 40-millimetre Smoke Grenade creates a large cloud of smoke, allowing the user to advance or retreat from their position without being seen, providing strategic advantages during raids.
The 40-millimetre HE Grenade is the preferred ammunition for raiding, capable of swiftly destroying metal structures such as sheet metal doors in just 9 shots. However, it cannot be crafted and must be acquired by looting heavy scientists.
The 40-millimeter Shotgun Round deals a significant 270 damage up close to the chest, boasting a rapid rate of fire of 150 rounds per minute. This combination gives the Grenade Launcher with Shotgun Rounds the highest DPS (Damage Per Second) of any weapon, reaching 675. These shotgun rounds can be purchased at the bandit camp for 15 scraps.
4) Satchel Charge for Raiding
Moving on, let’s explore the Satchel Charge, a relatively cheap, effective, and easy-to-obtain raiding device commonly used on Rust island.
Requiring a level one workbench and a Beancan blueprint, the Satchel Charge’s total path cost on the tech tree is 765 scrap, with a direct research cost of 125 scraps. Similar to the Beancan Grenade, the Satchel Charge also has a dud chance of 20 percent, which may result in a random explosion delay. This potential unpredictability requires caution while handling it, as it can catch you off guard and lead to fatal consequences.
Satchel Charges can be crafted or found in supply drops, sunken chests, crates, and on oil rigs.
5) Timed Explosive Charge (C4)

Next, let’s delve into the Timed Explosive Charge, also known as C4, which is the most challenging explosive to craft.
Requiring a level 3 workbench and the explosives blueprint, the C4 has a total path cost of 1,625 scraps on the tech tree, with a direct research cost of 500 scraps. Despite its complex crafting recipe, C4 is the most cost-effective method for raiding higher-tier bases, consuming less sulfur than other tools. However, it does require tech trash and additional components, making it more challenging overall.
C4 deals the most damage to structures, meaning only a few of them are required to break through walls or doors. It can be found within APC crates, helicopter crates, lock crates, supply drops, elite tier crates, and on heavy scientists.
6) Rocket Launcher for Raiding
Let’s look at the Rocket Launcher and its many kinds, which are effective raiding tools because they cause significant splash damage to neighboring structures.
The Rocket Launcher may be made at a level 2 workshop for a total cost of 2,300 scraps and 500 scraps for direct research. With a direct research cost of 125 scraps, the default rocket has a total path cost of 1,750 scraps.
Various Rocket Types
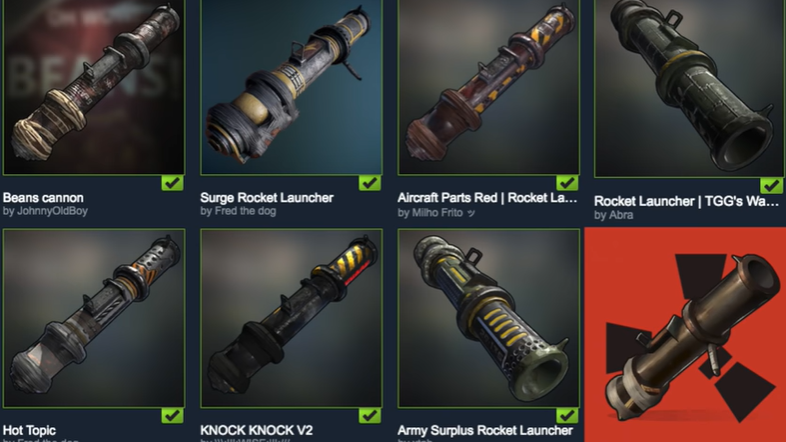
There are two different types of rockets that are usable with the rocket launcher:
1. Incendiary Rocket: A level 2 workshop can be used to create this rocket as well as the High-Velocity Rocket. When facing an NPC vehicle like the Bradley or engaging in combat, they are mostly utilized to deactivate traps. They are inferior to the default rocket in terms of effectiveness for base raiding.
2. High-Velocity Rocket: This rocket can be made at a level 2 workshop, as was already explained.
The Rocket Launcher’s Acquisition
In addition, to lock crates, elite crates, military crates, scientists working on oil rigs, and heavy scientists, you can also locate the Rocket Launcher in these locations.
Rust Effective Raiding Strategies: Navigating Pitfalls and Maximizing Success
1. Cautious Approach and Vigilance: Navigating the Danger Zones
- Avoid rushing into structures after breaking doors, mindful of potential shotgun traps around corners.
- Prioritize cautious entry and observation to detect any signs of suspicious activity within the base.
- Scrutinize every nook and cranny from a distance before advancing further.
2. Disarming Hidden Hazards: Mitigating Risks Before Progressing
- Identify and neutralize potential pitfalls before proceeding whenever possible.
- Disarm or destroy potential threats lurking within the base to ensure a safer raiding experience.
- Prioritize the deactivation of power sources that might trigger auto turrets or other powered traps.
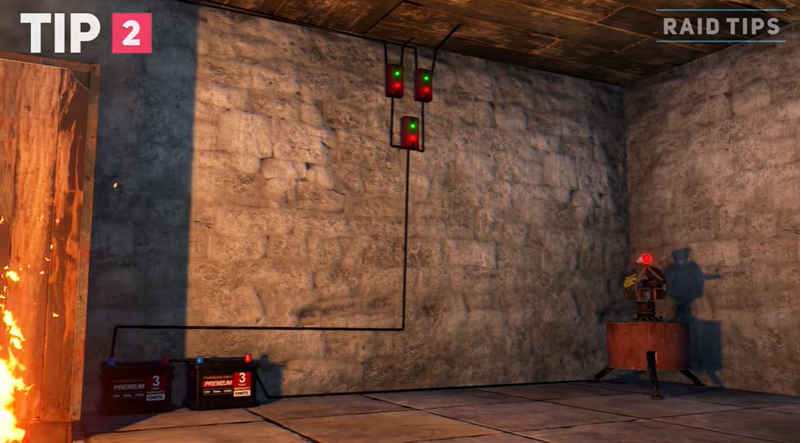
3. Mastering Power Source Awareness: Unveiling Hidden Danger
- Exercise vigilance in identifying power sources that could be linked to concealed
- Recognize powered traps through the presence of exposed wires, scattered batteries, and energy installations on the roof.
- Disrupt power sources strategically to drain batteries and render traps inactive.
4. Strategic Dismantling: Taking Down Energy Installations
- Employ a flamethrower and approximately 165 units of low-grade fuel to dismantle solar panels.
- Utilize four satchel charges to dismantle wind turbines effectively, enhancing raiding efficiency.
5) Utilizing Rockets in Raids
- Simultaneously breach walls and doors using explosives. Target gaps, assess damage, and maintain fire until all structures yield.
- Efficiently demolish walls and doors with rockets. Focus on gaps, assess after each shot, and persistently fire for success.
By adopting these comprehensive raiding methods, you can navigate potential hazards, disarm traps, and strategically dismantle power sources to maximize your chances of success while raiding.
Rust Raiding Tips and Strategies
In this segment, we will provide you with some valuable raiding tips and strategies to optimize your resource usage and increase your chances of a successful raid.
1. Accessing Multiple Loot Rooms
To save resources and access multiple loot rooms at once, target the tool cupboard inside the base to gain building privileges. Place your own tool cupboard and door to secure the loot and the base, reducing the risk of being counter-rated. Keep an eye out for hidden tool cupboards, as they might be placed in random walls or corridors.
2. Be Cautious of Counter-Raiding
Stay on high alert for counter-raiding attempts. When word spreads about a raid happening, it often attracts other players looking to seize the opportunity. Assign one of your friends to keep watch for potential counter-raiders while the rest of the team continues planting explosives.
3. Establish Nearby Small Bases
If you’re raiding a base far from your own, create a smaller base nearby with some loot in it. This serves as a spawn point and a depot to store loot from the raided base, especially if you lack tool cupboard access.
4. Efficient Use of Explosives
Use a combination of rockets and explosive bullets to efficiently destroy a sheet metal door. First, use a rocket to deal with most of the damage, and then finish it off with the remaining explosive bullets.
5. Exploiting Incorrectly Placed Walls
Look for walls incorrectly placed inside a base. Some players inadvertently leave soft sides exposed, allowing you to jackhammer or pickaxe your way into loot rooms or advantageous positions.
6. Level 1 Workbench in Raid Base
Install a level 1 workbench inside your pre-built raid base to refill jackhammers. They can be used throughout the raid to destroy soft side walls and, with enough people and time, even hard side walls.
7. Focusing on Entry Points
Prioritize raiding entry points like doors and hatches. They are generally cheaper and quicker to break compared to building structures like foundations, walls, and ceilings.
Raiding Tools for Building Structures in Rust
Let’s explore the best raiding tools for different building structures in Rust.
Wooden Building Structures
For wooden structures, the most effective raiding tools are the Flamethrower and Salvage Sword. If you have access to the hard side, the Flamethrower is recommended, costing around 206 low-grade fuel. For the soft side, use the Salvage Sword, requiring 15 metal fragments and one blade.
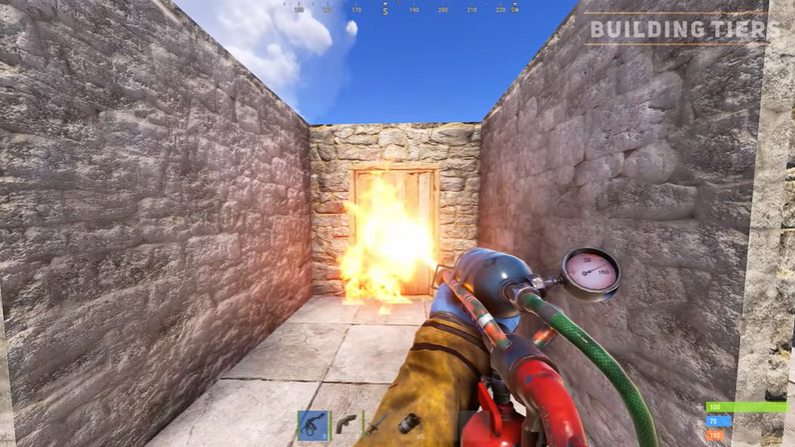
Stone Building Structures
When raiding stone structures, the following tools are recommended:
- Timed Explosive Charge (C4)
- Explosive 5.56 Rifle Ammo
- Satchel Charges
- Rockets
- Jackhammers
The cheapest tool for raiding stone bases is the Timed Explosive Charge or C4. However, satchel charges or explosive rounds can be used earlier in the game.
Metal Building Structures
For metal structures, the most effective raiding tools include:
- Timed Explosive Charge (C4)
- Explosive Rifle Ammo
- Rockets
- Jackhammers
To completely destroy a metal structure, you would need 4 C4, 400 explosive rounds, 8 rockets, or 3 jackhammers for the soft side of the wall. The cheapest tool for raiding metal bases is C4.
Armored Building Structures
Raiding armored structures requires powerful tools such as:
- Timed Explosive Charge (C4)
- Rockets
- Jackhammers
To completely destroy an armored structure, you would need 8 C4, 15 rockets, or 5 jackhammers for the soft side of the wall. The jackhammering process is time-consuming and tiring but saves 8 C4 overall.
Wooden Door (Entry Point)
The easiest entry point to raid is the wooden door, and the recommended tools are:
- Flamethrower
- Eoka Pistol
- Salvage Sword
- Beancan Grenades
To completely destroy a wooden door, you would need 83 low-grade fuel, 45 handmade shells, 9 swords, or 6 Bean grenades. The cheapest tool to raid a wooden door is the Salvage Sword, taking around five minutes to destroy it.
Sheet Metal Door (Entry Point)
For raiding sheet metal doors, the best tools include:
- Explosive Ammo
- Satchel Charges
- The mix of Rockets and Explosive Ammo
The most efficient tool depends on your resources and preferences.
Raiding Tools for Different Entry Points in Rust
In this segment, we will explore the best raiding tools for different entry points like the garage door, armored door, and ladder hatch, as well as a common base design known as the square base.
1) Garage Door
For raiding garage doors, the most effective tools include:
- Explosive Ammo
- Rockets
- Satchel Charges
To completely destroy a garage door, you will need around 150 explosive rounds, three rockets, or nine satchels. The cheapest tool for raiding a garage door is explosive rounds, saving you around 450 sulfur compared to the second-best option, the rocket. Rockets can be used to destroy multiple garage doors at once, saving resources and providing access to multiple loot rooms simultaneously.
2) Armored Door
The armored door is the strongest door for protecting loot. The best raiding tools for this door are:
- Timed Explosive Charge (C4)
- Explosive Ammo
- Rockets
To completely destroy an armored door, you will need two C4, 200 explosive rounds, or four rockets. The cheapest tool for raiding an armored door is C4, saving you around 600 sulfur compared to the second-best option, explosive rounds. Rockets can be used to destroy multiple double armored doors placed next to each other, providing access to multiple loot rooms simultaneously.
3) Ladder Hatch
The ladder hatch offers the same protection as the sheet metal door and is a common entry point for raiding. The best raiding tools for the ladder hatch are:
- Explosive Ammo
- Rockets
- Satchel Charges
To completely destroy a ladder hatch, you will need 63 explosive rounds, four satchels, or one rocket and eight explosive rounds. The cheapest tool for raiding a ladder hatch is explosive rounds, saving you around 225 sulfur compared to the second-best option, the rocket and explosive round mixture.
Different Base Designs and Raiding Considerations in Rust
1) Square Base Design
Square bases often have a triangle foundation sticking out from the front door, indicating the presence of an airlock. In smaller square bases, the loot room is usually just one wall away or sealed off, making it generally cheaper to go through the doors. Only consider going through the roof if you have enough resources, as it makes it harder for counter-raiders to access the base. Be cautious and pick the right square to drop onto the loot, avoiding potential traps.
2) Circle Base Design
The circle base design can incorporate various loot room arrangements, but typically the loot is hidden within the six squares located in the second ring, which is often protected by the honeycombed third ring. Target the center ring to gain access to each door or wall facing the six, where the loot is likely hidden. Proceed to use a jackhammer or rocket on these walls or doors to take them down all at once.
3) Bunker Base Design
Bunker bases can cause raiders a real headache. Once the homeowner is ready to log off or bunker up, they put down a roof or ceiling supported by a wall. Breaking this wall will destroy the roof or ceiling, as its stability no longer supports it. Raiding a bunker base requires more rockets or C4 as you have to go through walls or ceilings, which takes time and resources.
Raiding Factors in Rust: Cost, Speed, and Safety
When raiding in Rust, three primary factors come into play:
- Cost: Consider the raw materials required to reach the tool cupboard or loot. Some explosives and tools are more efficient than others, but this alone should not be your deciding factor.
- Speed: Speed is essential to secure the base quickly and prevent other players from counter-raiding. Your primary goal should be to reach the tool cupboard as fast as possible while keeping costs in check.
- Safety: Safety is crucial to avoid traps and hazards throughout the base. However, cost and speed take precedence over safety. You can quickly destroy or drain traps if you are prepared.
After selecting your target, consider the optimal detonation points and calculate the required explosives based on the chosen locations. For instance, if your assessment reveals 2 Sheet Metal Doors within the base, a total of 8 Satchel Charges will be necessary. Utilize Rust Labs to identify the most cost-effective raiding approach. This online resource enables you to specify the desired door or wall and determine the total amount of explosives and Sulfur needed.
If you really enjoyed this article and got all the important information about Raiding in Rust, checkout more content like this on our blog, Techforwardai.com.
Frequently asked questions:
What are the commonly used guns for raiding in Rust?
Yoka Pistol and Semi-Automatic Rifle are the commonly used guns for raiding in Rust
What are the main explosives used for raiding, and how do they differ in effectiveness?
Beancan Grenade, Eoka Grenade, and Flamethrower. Differ in materials and damage.
What are the different ammunition types for the Grenade Launcher?
Smoke Grenade, HE Grenade, Shotgun Round. Cover, raiding, and high DPS. are the different ammunition types for the Grenade Launche
What is the most challenging explosive to craft, and why is it considered the most cost-effective method for raiding higher-tier bases?
Timed Explosive Charge (C4). Cost-effective, less sulfur, and significant damage.
How can raiders optimize their resource usage and increase the chances of a successful raid?
Access multiple loot rooms, be cautious of counter-raiding, establish nearby small bases, focus on entry points, exploit incorrectly placed walls.